Archive for Treat

Dark Chocolate No-Guilt Fudge

    The recipe for Chocolatey Fudge from Ricki at Diet, Dessert and Dogs was intimidating. It sounded easy and yes, so yummy, but could it really be that easy? 

    I read and re-read the recipe and thought about my blender. Sometimes my wimpy old blender and I don’t get along but I am reluctant to learn a new machine along with a new recipe. Rita has a food processor stored here in my cupboard and next time I will definitely use it. You need a machine with ‘muscle’ for this recipe. The blender whined and groaned and started sending out smoke signals before we called truce. So this first batch has little bits of beans that are visible although not enough to stop any of my dedicated testers. And if you truly love deep, dark chocolate this will give you a chocolate fix without the sugar hangover. It looks like fudge, it tastes like fudge, and it IS fudge.

   You need to read Ricki’s version before you decide which way you would rather make it. She crumbles the unsweetened chocolate and adds it at the end. This version has it all melted in and fudgy smooth all the way through – almost the same ingredients but a different technique.

This Fudge Is Really Good!

This Fudge Is Really Good!

1 ounce (30 g) unsweetened chocolate, coarsely chopped
3 Tbsp (45 ml) coconut oil, soft at room temperature

1-3/4 cups (420 ml) cooked, drained and rinsed black beans (canned beans work best)
1/4 cup (60 ml) natural smooth almond butter, room temperature or slightly warmer
1/2 cup (60 g) cocoa powder
2 tsp (10 ml) pure vanilla extract
2 Tbsp (30 ml) yacon syrup, agave nectar or vegetable glycerin
15-25 drops plain or vanilla stevia liquid, to taste
pinch fine sea salt

    Line a loaf pan with plastic wrap and set aside.

    Place chocolate in a small microwavable bowl and spoon the coconut oil over it. Heat this in the microwave for one minute. Test the chocolate with a thin knife. The coconut oil should be hot and the chocolate just soft and melted but still holding its shape. This might take several iterations of heating and testing. Do – not – overheat!

    Add all of the remaining ingredients to the processor and pour the coconut oil/chocolate mixture on top and blend until very smooth. Use a spatula to help push down and incorporate all of the ingredients if necessary. The mixture will be thick. If the almond butter is the least bit chilly the coconut oil and chocolate can suddenly harden and seize.

    Transfer fudge mixture to the loaf pan and press down to compress it and push out any air bubbles. I sprinkled a packet of Truvia over the top to give it a ‘sugary’ finish but the loaf just dissolved the crystals and it disappeared overnight.

    Allow the fudge to set up in the refrigerator for an hour, then cover the top with more plastic and refrigerate until very firm, 2 hours or up to overnight. Slice into squares. Because it contains no sugar to act as a preservative it needs to be stored in the refrigerator for up to 5 days.

Gretchen (Mom)

Comments (2)

Microwave Baked Apples

    The SOS Kitchen Challenge ingredient for September is apples.  There are so many varieties of apples in the market right now. Choose your favorite or one of the weekly specials.  Usually I go for Golden Delicious but the Pink Lady variety is relatively new and entirely wonderful.  Ricki at Diet, Dessert and Dogs and Kim at Affairs of Living.  Be sure to check out the SOS Kitchen Challenge for September site for lots of other healthy recipe submissions by other bloggers.

    This is a naturally gluten-free treat that Don and I have enjoyed over the years. It began as apple pie with crust, canned pie-sliced apples, and lots of sugar, raisins, and cinnamon. The recipe morphed into baked apples after we received a set of individual ceramic baking dishes and decided that as a regular dessert it was better not to have all of that crust.
    After a while those convenient water-packed pie–sliced apples were no longer available so we alternated between baked apples from scratch or baked apples from pie filling enhanced with raisins and more cinnamon. The high-fructose-corn-syrup in pie filing always tasted like glue to me so I only ate baked apples when we used fresh apples.
    We began to experiment with the current recipe about ten years ago – while we were still living in the country. It was there that we settled on this mix of fresh, partially peeled apples, no-cal sweetener (I really was sneaky about the switchover), plenty of cinnamon, good vanilla to enhance the fruit flavor, and raisins. I always liked raisins. But no one I’ve ever known likes them as much as Don. His motto is ‘too many raisins is not enough’ – there is a song that goes something like that but it is not really about raisins.
    When we started using the microwave to cook in we switched from the ceramic bowls to inexpensive microwave-safe glass bowls so we prepare, bake, and serve all in the same easy-clean dishes.

Individual Baked Apple Desserts
1 apple per serving
1-2 tablespoons seedless raisins per serving
1 packet Truvia per serving (this is equivalent of 2 teaspoons of sugar)
Cinnamon to taste
About 6 drops of vanilla per serving

    Start with freshly washed and dried apples. Quarter, seed, and peel or not peel to your preference. I like a little more peeling and Don likes less. Cut each quarter into small bites and place a cut up apple in each microwavable serving dish.

A Quick and Easy Preparation

A Quick and Easy Preparation

    Add the raisins – here Don likes more and I like less. Then sprinkle the Truvia crystals over the fruit. Shake some cinnamon on top of the crystals and add the drops of vanilla. Stir to distribute then raisins and seasoning. Add some more cinnamon – almost always.
    Place the desserts in the microwave and set the timer for two minutes. Stir and cook for another minute. The apples will have started releasing juice and getting tender. The cinnamon, sweetener, vanilla, and apple juice are blending into a delectable coating for the apples and raisins. Microwave the mixture for one more minute. Remove the desserts to a rack and cover until somewhat cool. Right out of the microwave it will burn your tongue and that is not fun.

Baked and Ready to Serve

Baked and Ready to Serve

    This dessert is really good plain. The tart bites of apple with the sweet bits of raisin do not need embellishment. Top with a handful of chopped walnuts and you have breakfast.
    A tiny bit of fresh sweet cream, whipped cream, ice cream, full fat coconut milk, or a non-dairy frozen dessert makes an acceptable topping. One of those frozen-synthetic-low-fat-imitation-whipped-toppings is an insult to a good apple but if that is what rocks the boat for someone you love then you keep a tub of it in the freezer for them.
    Apples are in season and it is time to enjoy them!

Gretchen (Mom)

Comments (5)

Fig-Lemon Walnut-Streusel Cake

    The SOS Kitchen Challenge is going on and I am not going to make the cut this month. There has been too much going on and did I mention that Central Texas fruit trees have me swamped in frozen and cooked, pureed fruit? So if you love peppermint you need to check in with Ricki at Diet, Dessert and Dogs  and/or Kim at Affairs of Living for fabulous MINT recipes, mint being the challenge ingredient for August.
    During the next few months I will be looking at ways to create gluten-free recipes using mostly staples found on the shelves at The Caring Place food pantry. The organization is in the process of stepping up to the next level in service and has formed a focus group to look at useful options. I will be looking at making gluten-free easier for people who do not have the luxury of time to experiment.
    So right now I am finishing up a few experiments that have been rattling around in my head. This afternoon it was using puree I had prepared from fresh figs. Rita was laughing at me as I sniffed the batter and tried to decide what flavor options to emphasize and how to do it. She giggled and accused me of ‘huffing spices’.
    And I was so engrossed I forgot to take pictures along the way. Happily this is not just good cake it is REALLY GOOD. We are planning on having some more of it for breakfast in the morning.

Looks Good, Smells Good, Tastes Good!

Looks Good, Smells Good, Tastes Good!

Fresh Fig Puree:
About 4 cups of fresh figs, cut in halves or quarters depending on size
1/4 cup water
2 tablespoons agave syrup (to help draw the natural juice from the figs)
Place the figs, water, and syrup in a 1 quart saucepan that has a heavy bottom and a tight fitting lid. Place the pan on the stove and turn the heat on low. Be patient while the heat begins to ‘melt’ the figs and draw out their juice. The lid on my pan was glass so I could watch the steam gather and begin to baste the fruit. The figs should cook until tender but don’t boil them to pieces either. Stir occasionally so all of the pieces are evenly cooked. The flavor is delicate and you want to keep as much as possible.
    Remove the pan from the stove to cool when the fruit is done. When it has cooled somewhat then transfer the mixture into your blender jar. Push the button that says ‘puree’ and watch carefully. You may need to scrape down the sides for an even texture. This should not take more than a minute or so. Small bits of pulp are a good thing. Take a tiny taste – if it is not ‘fruity sweet’ then add a few drops of stevia to help it out. This should give you the amount of puree needed for the cake. A little more or less is OK. If the cake has more moisture then it will just bake a little longer.
Note: this can be stored in the refrigerator for several days before putting into the cake.

Wet Ingredients:
2 1/2 cups fig puree (about)
1/2 cup agave syrup
1 teaspoon ground chia seed
1/2 teaspoon fruit pectin
1/4 cup coconut oil (your choice of liquid cooking oil)
1 teaspoon vanilla
1/4 teaspoon lemon oil (found with essential oils and not with extracts)

Dry Ingredients:
1 1/4 cups quinoa flour
1/3 cup buckwheat flour
2 tablespoons tapioca flour
2 tablespoons coconut flour
2 teaspoons baking powder
1 teaspoon baking soda
1 teaspoon ground ginger
1/2 teaspoon sea salt

Walnut-Streusel Topping:
1/2 cup quinoa flour
3 small packets Truvia sweetener
1/2 teaspoon ground ginger
1/2 teaspoon ground allspice
1/2 teaspoon ground cloves
1/4 cup margarine (Earth Balance)(coconut oil probably OK)
3/4 cup finely chopped toasted walnuts (or your favorite nuts)
2 tablespoons agave syrup

    1. Pour the fig puree into a bowl. Sprinkle the chia seed across the surface and stir in quickly so it doesn’t have a chance to clump. Do the same with the pectin. Stir in the coconut oil, vanilla, and lemon oil and set the mixture aside.
    2. Sift the dry ingredients into your mixing bowl, stir with a whisk, and set aside.
    3. Prepare the streusel topping by mixing the flour, Truvia granules, and spices together. Cut in the margarine (or cold coconut butter) with a pastry blender. Add the chopped nuts. Lightly stir in the syrup with a fork. Then set this aside.
    4. Turn the oven on to 350*F. Lightly oil or spray 2 9” square pans and set aside.

    Stir the fig mixture quickly into the flour mixture. Divide the batter into the prepared pans and spread out evenly to the corners. Then carefully sprinkle the streusel mixture on top and press gently into the surface of the batter.

Remembering All of the Alterations

Remembering All of the Alterations

    Bake for about 25 minutes. If it still seems a little too moist then turn off the oven and let it remain for 2-3 more minutes in the residual heat.

Some thoughts about this recipe:
Most of the ingredients are nutritional superstars. This treat can be dessert or a meal. The flour ingredients are exactly the same as the Rhubarb-Date Pecan-Crumble recipe. The changes were the base puree and the spices and flavoring. I plan to experiment with different fruits and even mixing fruit and veggie, for instance banana or white squash with lemon and encourage others to play with it also. The ingredients that give this cake texture and post-baking stability are 1) chia seed stands in for an egg and 2) the fruit pectin combines with the acid in the fruit and the sugar in the agave to form the gel that produces jams and jellies.

Gretchen (Mom) and Rita

Comments (1)

Rhubarb-Date Pecan-Crumble Cake

This recipe is submitted to the SOS Kitchen Challenge hosted by Ricki at Diet, Dessert, and Dogs and Kim at Affairs of Living
    The choice of rhubarb for the June SOS Kitchen Challenge was – well, challenging. First, I have never tasted rhubarb. And possibly because I have never purchased rhubarb I have never noticed any at the farmer’s market or grocery stores. After reading the descriptions and warnings I went off looking for a huge bundle of poisonous green leaves hiding red rhubarb stalks. This is what turned up after searching several stores:

Rhubarb from the Grocery Store

Rhubarb from the Grocery Store

    This was a surprise, although a good one – the poisonous leaves were already eliminated and I refuse to speculate on that. After a thorough washing it was time to dice. I had a recipe for an applesauce coffee cake that was my baseline for this attempt and dicing the rhubarb into 1/2” – 3/4” pieces was the first step. But what’s with all the string? This is way stringier than my beloved celery.

Not Sure About All That String

Not Sure About All That String

    Most of the string was stripped off during the dicing process while I worried about whether losing it would affect the color. That turned out to be the least of the issues. (It was great to discover that rhubarb does not stain the counters and surroundings like beets.)

Somewhat Under Control

Somewhat Under Control

    So into the saucepan it went; along with some chopped dates to sweeten it up, a bit of water and agave syrup for the cake. It simmered gently until the rhubarb was coming apart.

    I had failed to note that the original recipe included tofu and my system can’t handle that. So then began the mental scramble that usually results when substitutions are necessary. There were also flour modifications in keeping with my whole ‘no-grass-plants-allowed’ mindset right now. It became an all-out juggling act.

Putting It All Together

Putting It All Together

    Plus my square pans are all 8” so several cupcakes took up the extra batter and crumble topping. The crumble topping is messy and umm, crumbly. Maybe next time a layer of batter, crumble for filling, and the batter on top, kind of like the once popular sock-it-to-me cake.

Fresh Out of the Oven

Fresh Out of the Oven

Wet Ingredients:
1 1/2 cups rhubarb, chopped, 1/2”-3/4” bits
3.5 ounces pitted dates, chopped
1/2 cup water
1/2 cup agave syrup
1 teaspoon ground chia seed
1/2 teaspoon fruit pectin
1/4 cup coconut oil
1 teaspoon vanilla

Dry Ingredients:
1 1/4 cups quinoa flour
1/3 cup buckwheat flour
2 tablespoons tapioca flour
2 tablespoons coconut flour
2 teaspoons baking powder
1 teaspoon baking soda
2 teaspoons ground cinnamon
1/2 teaspoon sea salt

1/4 cup milk, optional (Almond Breeze)

Pecan-Crumble Topping:
1/2 cup quinoa flour
1/4 cup agave syrup
1/2 teaspoon ground cinnamon
1/4 cup margarine (Earth Balance)
3/4 cup chopped pecans (use your favorite nuts or crispy cereal for crunch)
(I thought about crumbling a rice cake but already had too much going on)

Put the rhubarb, dates, water, and syrup in a saucepan and simmer slowly for about 10 minutes. The rhubarb should be very soft by then. Remove the pan from the stove and allow to cool. Stir in the chia seed, pectin, coconut oil, and vanilla and set aside.

Sift the dry ingredients into your mixing bowl and set aside.

Prepare the crumble topping by mixing the flour and cinnamon together. Cut in the margarine (or cold coconut butter) with a pastry blender. Lightly stir in the syrup with a fork. Then add in the nuts.

Turn the oven on to 350*F.  Lightly oil or spray a 9” square pan and set aside.

The rhubarb mixture should be fairly cool by now.  Stir it quickly into the flour mixture.  If the batter is really thick then add the 1/4 cup of milk.  Scrape the batter into the prepared pan and spread out evenly to the corners.  Then carefully spoon the crumble mixture on top and spread evenly also while pressing gently into the surface of the batter.

Bake for about 35 minutes.  If it still seems a little too moist then turn off the oven and let it remain to bake for 5-10 more minutes in the residual heat of the oven.

Allow the cake to cool thoroughly.  As with many of these stronger flours it will be better the longer it cools.  It is really best if you can make it a day ahead.

Mom (Gretchen)

Postscript: The Sit ‘N Stitch ladies were at Barb’s house today and I brought this over for taste testing.  This little cake went over very well.  So the question is: if people appreciate the taste of nutritious food then why doesn’t the food industry provide it?  It could be done . . . .

Comments (3)

Coconut Milk Panna Cotta

Those Neglected Bananas
   Those four-week-old over-ripe bananas finally were rescued. I love bananas but Don does not. Consequently it took me awhile to get around to preparing a recipe that could not go into the freezer to be used up gradually.

Those Poor Neglected Bananas

Those Poor Neglected Bananas

   I had been dreaming about trying something like this but now it was time to buckle up and go for it. Unflavored gelatin, a can of coconut milk, Mexican vanilla, stevia, and those four bananas went through the blender. The creamy result was poured in a mold and put in the refrigerator to set up. The liquid tasted a bit astringent – bananas and coconut milk each have a bit of that quality. By the time we returned from the fitness center it had set up and was ready to unmold. The astringent quality had mellowed.
   By the next morning (Panna Cotta for breakfast is like having ice cream for breakfast – decadent but still healthy enough) the astringency had mellowed even more. But then I thought I noticed the bananas in the panna cotta were causing it to darken and change color as if the bananas were continuing to ripen even more!
   Never-the-less it is still retains a good flavor – but I’m thinking along these lines:
1) Plan ahead – if it is made with bananas then you really need at least six or more people on hand to share it with.
2) Or, make it with apples – sautéed with a bit of coconut oil, sweetener, and cinnamon so that there is about 1 1/3 (a bit more or less) cups of apple to pulse in the blender. I’m going to try it this coming weekend when we have another cold front coming through (the kitchen will be a warm, cinnamon-scented refuge). My beloved husband loves apples so I can depend on him help me evaluate an apple version.

Banana Coconut Panna Cotta

Banana Coconut Panna Cotta

Ingredients:
4 very ripe bananas, peeled (or about 1 1/3 cups prepared fruit of your choice)
2 packets gelatin (I have agar but haven’t played with it yet to make it totally vegan)
1/4 cup water
1 can coconut milk
1 teaspoon vanilla

Do this first:
Assemble and plug in the blender. Place the prepared fruit into the container. If you plan to use a mold you need one that will hold 3 cups of liquid and give it a very thin coat of Pam or coconut oil to help the panna cotta to unmold. You will still need to dip the mold in hot water for it to release neatly onto your serving plate.

Prepare the gelatin mixture:
Add the water to a small stainless steel saucepan. Sprinkle on the gelatin and add in the vanilla. Allow the gelatin to absorb the liquids and swell up. Then place the pan on the stove and turn the heat on very low. Slowly melt the gelatin. Pick up the pan occasionally and tilt to move the grainy bits around so they will melt more evenly. When all of the mixture is nearly melted use a metal spoon to gently pull any remaining unmelted grains out from the edges into the center of the pan (this IS tedious but essential). The gelatin must be completely melted before it will blend with the remaining ingredients. Unmelted gelatin will not congeal and the panna cotta will not ‘set’.

When the gelatin is entirely melted then quickly pour in the entire can of coconut milk, set down the can and stir the mixture to distribute the gelatin throughout the coconut milk. Scrap any remaining milk and solids from the can into the pan. Turn off the heat but leave it set for a few minutes.

Turn on the blender and pulse gently to puree the fruit. It doesn’t take but a few moments. Too much will oxidize the fruit, turn it brown, and degrade the flavor. Pour the warm mixture from the pan into the blender jar with the fruit. There should be about 3 cups of liquid altogether. Blend the mixture for about 30 seconds before pouring into a bowl or prepared mold. Chill for several hours until it is completely set.

Mom

Leave a Comment

Coconut Banana Muffins

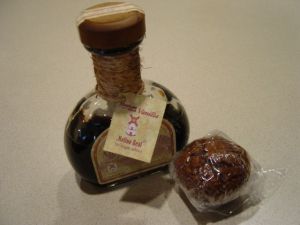
   The treasured souvenir that I brought back from our Mexico cruise after Thanksgiving was some of that fabled Mexican vanilla – a few bottles to share and one for me. It has been such a treat that my supply is rapidly dwindling. I searched the internet for a more local supply and this is what I found. Molino Real Vanilla 

Molino Real Vanilla

Molino Real Vanilla


   These petite muffins are densely nutritious and very filling. They make a wonderful first breakfast with a cup of coffee or tea and/or a delightful little afternoon snack. The Mexican vanilla described above, along with the coconut flour, gives them a delightful fragrance. I shared these with friends at The Caring Place for expert opinion as they are not very sweet. Clara, who has gluten issues, gave it two thumbs up. Ann, who does not have gluten issues and has much baking experience, also gave the recipe a high rating. I love it when friends from both sides of the gluten equasion equally enjoy a recipe. I used dried cranberries which added a bright touch of color to a light colored muffin. 

Out of the Oven

Out of the Oven


Adapted from Salba Banana Coconut Muffins (GF)  at the Salba.com

Coconut Banana Muffins
2 tablespoons coconut oil
3 room-temperature eggs
1/3 cup mashed banana (1 small, ripe banana)
1 teaspoon alcohol-free vanilla flavor or vanilla extract
12 drops of liquid stevia or 2 small packets granular stevia 

1/4 teaspoon baking powder
1/4 teaspoon salt
1/2 teaspoon ground cinnamon
1/4 cup coconut flour
1 tablespoon shredded coconut, unsweetened (desiccated)
2 tablespoons whole or ground chia seed
2 tablespoons raisins, cranberries, blueberries or finely chopped nuts or cocoa nibs 

Preheat oven to 400ºF.
   Sift and whisk together the baking powder, salt, cinnamon and coconut flour (it keeps better in the freezer but it does get clumpy) in a medium mixing bowl. Add the chia seed, coconut, and optional ingredients and whisk again to blend the dry ingredients.
   Whisk together oil, eggs, banana, and vanilla in a small bowl. Pour into the dry ingredients and whisk until well mixed. Measure spoonfuls of batter into silicon muffin cups or a muffin pan greased with coconut oil. I used a large size kitchen scoop (50 ml – 10 teaspoons) and filled the silicon muffin cups to the inside line which produced seven muffins.
   Bake 15 minutes or until toothpick inserted into the center of a muffin comes out clean. Cool on a wire rack for 5 minutes and then pop out of the pan or liners. Serve immediately or wrap individually for later use. The flavor seems to improve/mellow after wrapping and cooling and the fragrance comes through the wrapping!
   Even with the banana and cranberries these muffins have only about 11 grams of carbs with 4 grams of fiber, 4 grams of protein and a  very low GI index which makes them ideal for these post-holiday low-carb high-protein diets. 

Mom

Comments (3)

Sunsweet Ones – Individually Wrapped Dried Plums

   These Sunsweet ONES are one of my ‘emergency food’ selections. Heading out the door for a round of errands I grab my bottle of water and throw a few of these in my pocket or purse. They are a sweet treat in a naturally healthy package of vitamins, minerals, fiber, and anti-oxidants. Each one is about 25 calories so you can choose to have one or a handful. They do not melt or ooze a sticky mess in the bottom of your pocket or purse. These ‘ONES’ became a favorite after several individually wrapped chocolate mints melted into the bottom of my good summer bag. ‘Emergency food’ saves time, is gluten-free, healthy, and usually more economical than grabbing something at a convenience store when you are having one-of-those-days.

Mom

Leave a Comment

Torani – Naturally Flavored Syrups

Rita and I were shopping at World Market in Round Rock and found the Torani flavoring syrups, regular and sugar-free options, and this is their current information on gluten.

Torani – Frequently Asked Questions
http://www.torani.com/faqs

Which syrups contain Gluten?
‘Bacon, Classic Caramel, Sugar Free Classic Caramel, Toasted Marshmallow and Sugar Free French Vanilla.’
*updated January 13, 2013

They have a wide selection of flavors and World Market must sell a lot of them – they are in a large impressive display at the center of the back wall. This gives us something else for our arsenal of no-guilt treats! Use them to flavor coffee or tea and/or to mix with sparkling water to make your own refreshing soda. There are some preservatives so read the label.

Mom

Comments (4)

Pear-Plum-Date Catsup

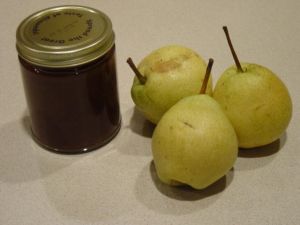
   The Central Texas fall Keiffer pear crop has been almost overwhelming. These are hard, crispy pears with a subtle sweet flavor that need to be ripened properly for happy results. Otherwise you might try them too soon and think that they are only fit for chunking at the squirrels. Full details on growing and handling these pears can be found online at Keys to the Keiffer Pear .

   The usual advice is to keep them in a cool place, 60*F – 65*F, for two to three weeks, even longer if you store them in the fridge. They will slowly soften and sweeten so that when you have nearly forgotten about them you suddenly have a great deal of ripe fruit on hand. They will still be crispy, like apples, but no longer tasteless and hard as rocks.

   Rita had told me some time ago about a young woman with an allergy to the nightshade family of plants which includes all peppers (sweet or hot), potatoes, and tomatoes. News about this kind of allergy had started a thought process around catsup; and if you can make catsup then barbeque sauce cannot be far behind. The internet turned up several recipes for plum catsup and there are even commercial brands available. But with all of these pears on hand and my bent for simplifying and using locally available wherever possible this Pear-Plum-Date Catsup is what evolved.

   Also these steps can be done entirely separate; by a couple of days if need be. So if you are busy, tired, interrupted, whatever, you can still make this catsup.

Pear-Plum-Date Catsup - really?

Pear-Plum-Date Catsup - really?

4-6 pears, at least somewhat ripe
6 dried plums (we used to call them prunes)
6 dates (Medjool was in the pantry)
1/4 cup evaporated cane juice

   1. Wash the pears and rinse well. Cut out all bits of the gritty core but do not peel. Cut them into small pieces that your blender can handle easily. You should have a heaping two cups of chopped pears. Cut up the dried plums to be sure there are no residual pit pieces. Remove the seeds from the dates. Put all of the fruit into a one-quart saucepan and add about a tablespoon of water. Pour the evaporated cane juice in and stir a bit. The sugar at this stage is to help the pears release their juices. The cooking is done over very low heat for 30-60 minutes (this depends on your pears and patience). Set the timer every 15 minutes to stir and check several times during this part of the process. You don’t have to hover, just be sure you can hear the timer. Turn off the heat when the pears are fork tender and go do something else – knit, work out, fix dinner, take a nap.

   2. Put the cooled, cooked fruit through the blender. The fruit is tender but the mixture is thick so the sides need scraping down to get all of the bits incorporated. At this point I poured the pureed fruit back in the pan and put it in the fridge to finish up the next day.

   3. Put the pan back on the stove. Add the following ingredients, heat and stir:

1/4 cup evaporated cane juice
1/2 cup apple cider vinegar
1 teaspoon sea salt
1 teaspoon ground allspice

The mixture should be thick enough to mound in your spoon but slide easily back into the pot. If it is not thick enough then simmer on low heat until it is the consistency that you prefer. The hot mixture will spatter your stove at this point so you may want to tilt a lid on the pot.

   4. Spoon your catsup into clean jars with good screw-on lids. This recipe makes about 2 cups with a little extra for testing on a burger.

   Other internet recipes suggested cloves, ginger, cinnamon, and pepper in various combinations. After I added the vinegar and allspice I tasted a tiny bit on a spoon. It reminded me so much of my former favorite Hunt’s Ketchup* that I stopped right there. Follow your taste buds to create your own favorite combination!

Mom

*There is inconclusive information available regarding gluten in this product. Some references say it is gluten-free and others say it is only wheat-free thus ignoring other gluten contaminates. The Hunt’s website says nothing which in itself says a lot. Also, a major ingredient is high fructose corn syrup – homemade catsup sounds better all the time!

Comments (2)

Sweet Potatoes – Breakfast, Snack, and/or Dessert

     My younger daughter, Teresa, once commented that I had a sweet potato addiction. She may not have been wrong. Over the years I have definitely consumed my fair share and possibly more. But would you rather be enamored of donuts or a little treasure with a nutrient profile like this?
Kcal=100
Vitamin A=430%
Vitamin C=37%
Fiber=4 grams
Fat=0
Glycemic Index=10

    Sweet potato shopping can be disconcerting because there is seldom any consistency in size. In addition, depending on the growing season, there are considerable variances in moisture content. All of which make it difficult to calculate cooking times if you are baking, boiling or microwaving them whole and unpeeled which conserves more of their natural goodness.
    Do not allow yourself to become lulled into complacency by a series of relatively consistent sweet potatoes as I once was. One day the timer on the microwave went off and I opened the door to a mushroom cloud of black smoke. Anxiously peering through the gloom the sweet potato seemed to be OK – until it was discovered to be a featherweight, empty shell. Now that is scary food . . . . .
    One of my favorite, and of course, simplest ways to grab a sweet potato fix is to microwave one that has been thoroughly scrubbed and punctured about 6-8 times with a knife (let’s not even re-visit the exploding sweet potato dilemma). Place the sweet potato on a saucer or paper towels to catch the syrup that bubbles out while it is roasting. Begin to check status after 3-4 minutes depending on the size. When it is fully cooked it will be soft enough that it gives like a ripe avocado. It can take up to 6-8 minutes for one that is three inches wide – or more, depending on the heat generated by the particular microwave. Run the knife into it to double check. Remove it from the microwave once it is tender and allow it to steam for about five minutes while you round up your seasoning.

For those of us with the terrible-sweet-tooth syndrome these are my most favorite fixings:
Vanilla
Cinnamon
Sweetener

Breakfast, Snack and-or Dessert

Breakfast, Snack and-or Dessert

    Mash the sweet potato in its skin. Season with a few drops of vanilla (it makes it taste like you added marshmallows), a sprinkle of cinnamon, and your choice of sweetener. Add a cup of hot tea and slowly savor your healthy breakfast, snack, or dessert.
    I re-purpose small dropper bottles and fill them with various flavorings – it saves time and oops! And I keep cinnamon and allspice in old salt shakers for the same reason. They come in handy for jazzing up  small servings of tea or whatever.

Mom

Comments (1)

Older Posts »